Objective
- Replace the text and pictures into a specified size. The information is from a spreadsheet.
- Do it in a simple GUI so that all work can be done in simple clicks.
Analysis
The information of the ID is from a spreadsheet as ".xlsx". The resulting document is in the extension of ".docx".

From the word document shown in Fig 1, it is shown that the IDs are in a table that contains rows with two columns. Each row is an ID. The first column is the information part and the second column is the unchanged part. Therefore, only the first column of each row will be adjusted.
In the first column, there are texts and pictures to be updated. As shown in Fig 2, the picture is not an inline object.

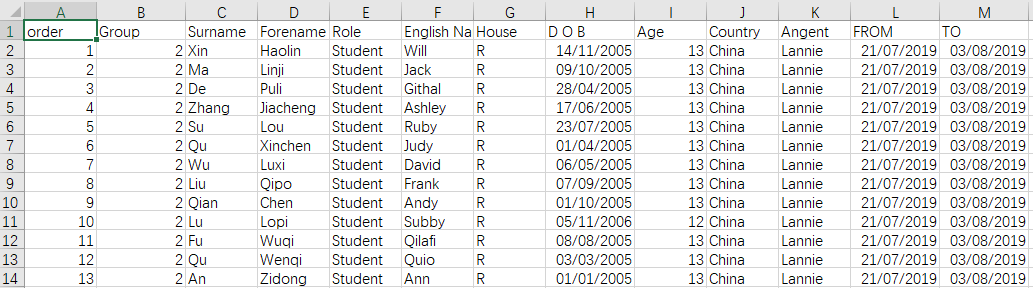
In the spreadsheet, the format is shown as Fig 3.
Solutions
1. Python - python-docx package
The first solution that occurred to me is using python to do the automation. I found a package called python-docx. From its documentation, it can read table cells and extract text as paragraphs. I prompted the prompter to extract the content from the cell. The result is shown as Fig 4.

It is said there are 5 paragraphs in the cell. So I just need to replace the paragraphs into the content I want to display. However, there is a problem: the image in the cell is a floating shape instead of the inline image, which means that
python-docx cannot handle the image in the document. (You cannot find a class to edit the floating shape in Docx in the documentation). Therefore, there should be the other solution to automate the document.
2. Virtual Basic for Applications (VBA)
Cross Application Support
Instead of using the third-party language to operate the word document, VBA could be the best solution to operate the documents of Microsoft Office products.
It needs the data from a spreadsheet with an extension of ".xlsx" and the resulting document is in ".docx", which means that the program needs to operate the Word Application and Excel Application at the same time. I chose to operate inside Word Application, so the crossing reference should be 'Excel Application'. As shown in Fig 5, in this case, the reference should be 'Microsoft Excel 16.0 Object Library' and enable it to access Excel in Word.

VBA has very good support of GUI. Insert a user form. Double-click the form, to open the code-editing window.
I have tried the declaration of Excel Application as told on the Internet.
Dim objExcel as Excel.Application
Dim wbExcel as Excel.Workbook
Set wbExcel = objExcel.Workbooks.Open(path)
But that didn't work at all with an error. Instead, this will work.
Dim obExcel as Object
Set objExcel = CreateObject("Excel.Application")
Dim exWb As Excel.Workbook
Set exWb = objExcel.Workbooks.Open(path)
The paths of the spreadsheet and picture should be the public variables. So those two are declared at the begining of the program.
Public path as String
Public pic as String
GUI Design of UserForm
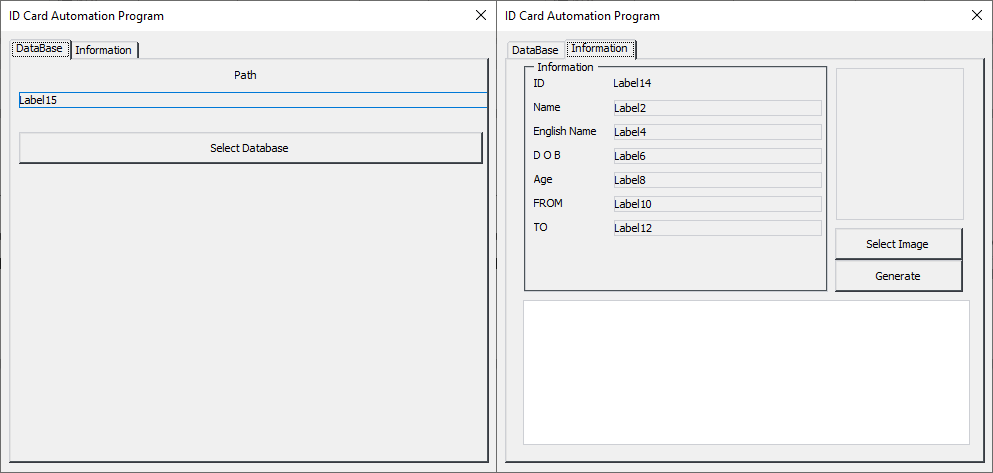
The user form is edited to make it easy to use for users. That design is shown in Fig 6.
I found that the program will be unstable if the Excel Application is declared as a global variable so I declare it in every sub-function and clear the excel application at the end of the sub-function.
Database selection
In the 'Database' tab, the path of the spreadsheet is selected. To select the path, a file browser is used. When the file is selected, the path string is exported to the public variable path and shown in the Label. Double click the button, and input the code as below.
Dim objExcel As Object 'Excel.Application
Set objExcel = CreateObject("Excel.Application")
Dim exWb As Excel.Workbook
Dim fDialog As FileDialog, result As Integer
Set fDialog = Application.FileDialog(msoFileDialogFilePicker)
fDialog.AllowMultiSelect = False
fDialog.Title = "Select Database"
fDialog.InitialFileName = "C:\"
'Optional: Add filters
fDialog.Filters.Clear
fDialog.Filters.Add "Excel files", "*.xlsx"
fDialog.Filters.Add "All files", "*.*"
If fDialog.Show = -1 Then
    Label15.Caption = fDialog.selecteditems(1)
    path = Label15.Caption
End If
objExcel.Quit
Set objExcel = Nothing
ListBox Control
After the database (spreadsheet) has been selected, then the data is listed in the Listbox area. It can be shown when the tab is switched between each other. And there should be an exception for the case that there is no database selected, where there is no operation. The code is shown below.
Dim objExcel As Object 'Excel.Application
Set objExcel = CreateObject("Excel.Application")
Dim exWb As Excel.Workbook
Dim lrow As Integer
Dim i As Integer
If path = "" Then
    Exit Sub
Else
    Set exWb = objExcel.Workbooks.Open(path)
    lrow = exWb.Sheets(1).Cells(Rows.Count, "A").End(xlUp).Row
    For i = 1 To lrow - 1
        ListBox1.AddItem i
        ListBox1.List(i - 1, 1) = exWb.Sheets(1).Range("C" & i + 1).Value & " " & exWb.Sheets(1).Range("D" & i + 1).Value
    Next i
End If
objExcel.Quit
Set objExcel = Nothing
It imports the data from the spreadsheet and counts the number of rows in the datasheet to iterate to the last row. Then the data is listed in the listbox.
When an item in the Listbox is selected, the detail of the item is displayed in the 'Information' area. So it happens when the Listbox is clicked. It iterates the index until the item is selected and then the information of the item will be extracted and updated to the labels in the area. the code is shown below.
Dim objExcel As Object 'Excel.Application
Set objExcel = CreateObject("Excel.Application")
Dim exWb As Excel.Workbook
Set exWb = objExcel.Workbooks.Open(path)
Dim selecteditem As String
Dim i As Integer
For i = 0 To ListBox1.ListCount - 1
    If ListBox1.Selected(i) Then
        Label14.Caption = exWb.Sheets(1).Range("A" & i + 2)
        Label2.Caption = exWb.Sheets(1).Range("C" & i + 2).Value & " " & exWb.Sheets(1).Range("D" & i + 2).Value
        Label4.Caption = exWb.Sheets(1).Range("F" & i + 2).Value
        Label6.Caption = exWb.Sheets(1).Range("H" & i + 2).Value
        Label8.Caption = exWb.Sheets(1).Range("I" & i + 2).Value
        Label10.Caption = exWb.Sheets(1).Range("L" & i + 2).Value
        Label12.Caption = exWb.Sheets(1).Range("M" & i + 2).Value
    End If
Next i
objExcel.Quit
Set objExcel = Nothing
Image Control
The operation of selection of the image is the same as that of the database.
After the image is selected, the path string is exported to a public variable pic and the image box shows the image. The code is shown as below.
Dim fDialog As FileDialog, result As Integer
Set fDialog = Application.FileDialog(msoFileDialogFilePicker)
fDialog.AllowMultiSelect = False
fDialog.Title = "Select Database"
fDialog.InitialFileName = "C:\"
'Optional: Add filters
fDialog.Filters.Clear
fDialog.Filters.Add "Image files", "*.jpg, *.bmp, *.gif, *.ico, *.cur, *.wmf"
fDialog.Filters.Add "All files", "*.*"
If fDialog.Show = -1 Then
    Image1.Picture = LoadPicture(fDialog.selecteditems(1))
    pic = fDialog.selecteditems(1)
End If
Generate the ID
To generate ID, there are some operations to be done:
- Convert the data in the database to a proper format
- Substitute the information into the ID
- Change the picture
- The message "DONE!"
Convert the data in a proper format
The only data that need to be carefully converted is the date. It has to be in "12 July 2019", which is the long date format of date string. The date should be in "12 July to 20 July 2019". The function to achieve that is shown below.
Public Function ToDates(ByVal FROMD As String, ByVal TOD As String) As String
Dim temp() As String
temp() = Split(Format(FROMD, "Long Date"), " ")
ToDates = temp(0) & " " & temp(1) & " and " & Format(TOD, "Long Date")
End Function
Replace the text
It is difficult to get the first line or the second line etc, so it is easier to find and replace a specified word. For example, Name is for replacing the name of the person. Note that the value of the replaced text should be used carefully because it may substitute the unexpected value. E.g. "English Name" and "Name", "Replace "Name" at first will result in the replacement of the "Name" in "English Name".
Add Row
The rows of the table in the Word document may not be enough so the row can be added if there is no enough row to operate. As said in the section above, the ID should have some specified word, which means that there should be a template. Therefore, I added a template in the first page and now the template is Table(1) and the table operated is Table(2). The idea is to select the row, copy that and paste that to the operating table as a new row after the last row. Its code is shown below.
Sub AddRow()
ActiveDocument.Tables(1).Rows(1).Select
Selection.Copy
ActiveDocument.Tables(2).Rows.Add
ActiveDocument.Tables(2).Rows(ActiveDocument.Tables(2).Rows.Count).Range.Paste
ActiveDocument.Tables(2).Rows.Last.Delete
End Sub
Change picture
The pictures are not inline pictures, so they are regarded as shapes. I draw a transparent rectangle with the size of "3.5cm X 2.5cm" in each ID to operate. Then the operation is easy:
- Position the shape with ShapeRange
- Fill the shape with the picture
- Set it visible
The code is shown below:
'change picture without change image size
Sub change_picture(Filename As String, rng As Range)

    rng.ShapeRange.Item (1)
    rng.ShapeRange.Item(1).Fill.UserPicture Filename
    rng.ShapeRange.Item(1).Fill.Visible = msoTrue
    rng.ShapeRange.Item(1).Select

End Sub
Final Generate
The whole Generate function is shown below:
Private Sub Generate_Click()
Dim objExcel As Object 'Excel.Application
Set objExcel = CreateObject("Excel.Application")
Dim exWb As Excel.Workbook
Set exWb = objExcel.Workbooks.Open(path)
Dim selecteditems As String
Dim i As Integer, j As Integer
Dim rng As Range
If exWb.Sheets(1).Range("A1") = "" Then
MsgBox "Please Select a database in the Database Tab!"
Else
For i = 0 To ListBox1.ListCount - 1
If ListBox1.Selected(i) = True Then
selecteditems = ListBox1.List(i, 0)
If ActiveDocument.Tables(2).Rows.Count < i + 1 Then
    For j = 1 To i - ActiveDocument.Tables(2).Rows.Count + 1
        AddRow
    Next j
End If
Set rng = ActiveDocument.Tables(2).Rows(i + 1).Cells(1).Range
With rng.Find 'English Name
    .Execute FindText:="English Name", ReplaceWith:="(" & exWb.Sheets(1).Range("F" & i + 2).Value & ")", _
    Format:=True, Replace:=wdReplaceAll
End With
With rng.Find 'Name
    .Execute FindText:="Name", ReplaceWith:=exWb.Sheets(1).Range("C" & i + 2).Value & " " & exWb.Sheets(1).Range("D" & i + 2).Value, _
    Format:=True, Replace:=wdReplaceAll
End With
With rng.Find 'DOB
    .Execute FindText:="DOB", ReplaceWith:=exWb.Sheets(1).Range("H" & i + 2).Value, _
    Format:=True, Replace:=wdReplaceAll
End With
With rng.Find 'FROM_TO
    .Execute FindText:="DATES", ReplaceWith:=ToDates(exWb.Sheets(1).Range("L" & i + 2).Value, exWb.Sheets(1).Range("M" & i + 2).Value), _
    Format:=True, Replace:=wdReplaceAll
End With
Call change_picture(pic, rng)
End If
Next i
End If
objExcel.Quit
Set objExcel = Nothing
MsgBox "Generate Done!"
End Sub
Add the button to the document to operate
Insert a button and double click it. Make the User Form visible when the button is clicked. The code is shown as below.
Private Sub CommandButton1_Click()
UserForm1.Show
End Sub
Result
The result is shown in Fig 7.
